Today I have a tutorial to show you how to take out excess fabric in the back thigh of the Lisbeth Pants. I am using Lisbeth pants as an example, but if you are having similar issues with other pant patterns, this tutorial will help as well.
A couple of things before we jump into the details. I wanted to remind you that just like with Ready-To-Wear clothing a pattern may not fit you perfectly out of the envelope. Different brands use different fit models and draft for various bodies. Anna-Zoe patterns are drafted with more of a bigger booty and thicker thigh in mind. So someone with a more slender body is likely to experience some fit issues.
I also want to thank my amazing testers and this particular tester who agreed for me to feature her fitting issues in this blog post. I opted not to use her photographs and instead created illustrations highlighting the issues I saw. I think this will both preserve anonymity and make the fitting issues a bit clearer. Thank you!

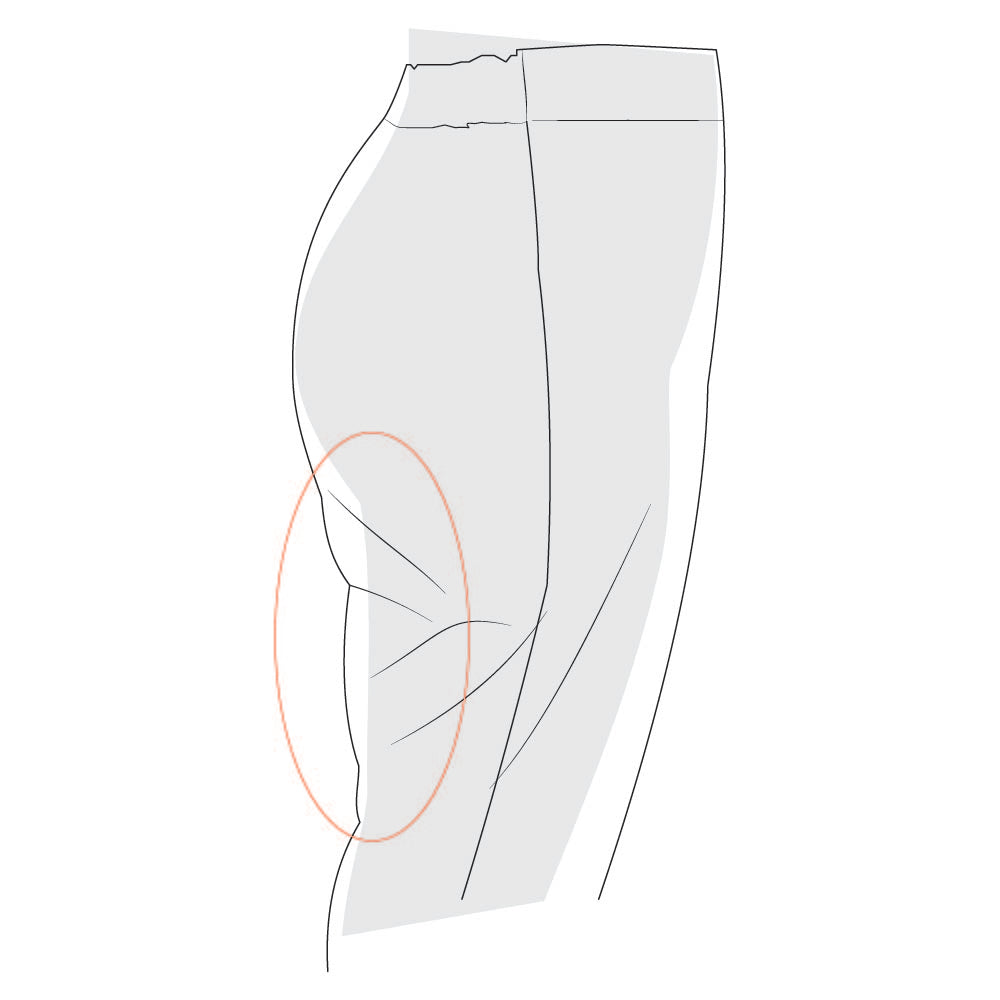
The illustration above shows the fit issues that the pants presented when made for the first time. Originally we thought that a flat bum adjustment was needed, but after looking at the photos of the tester in leggings and comparing them to the photos with pants on I thought that the flat bum was not the issue.
It is so beneficial to know what your body (or the body you are trying to fit) looks like! For this reason I always ask for photos of the person wearing leggings so that I can see the true shape we are trying to fit.
In the image above I drew the outline of the bottom half of the body (while the tester was wearing leggings) and put the outline of the pants on top. My conclusion was that the pattern had too much room in the thigh to fit properly. And it makes sense, my patterns are drafted with me as a "fit model" and I do usually have thicker thighs that I have to adjust for on all the other patterns.
1. Pin out the excess fabric
There is too much fabric right under the bum and this is what we will need to take out. If this is your issue too, then start by trying to pin some excess fabric vertically. It will be hard to do by yourself, but it does not need to be perfect, you just need a rough estimate of how much you need to take out.
Doing this may also help bring the side seam a little bit more backward, as it also seemed to lean to the front in the fit photo/illustration.
2. Measure the pinned fabric
Measure the amount you pinned out – you can measure just one side since we would have to divide the total amount by 2 anyways.

3. Draw in seam lines
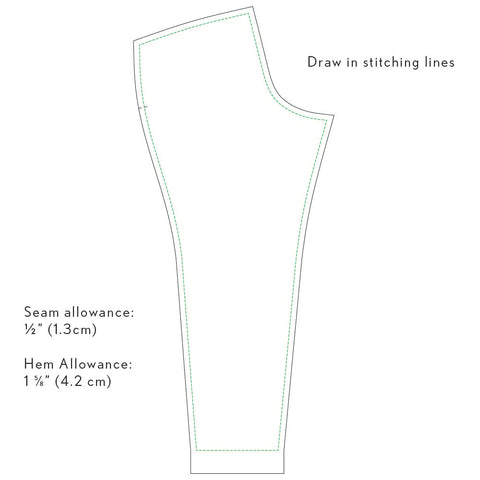
On your pattern pieces, draw in the seam lines. The seam allowances on the Lisbeth pants are ½” (1.3 cm), and the hem allowance is 1 5/8" (4.2 cm), although is it not necessary to draw in the hem allowance and you can skip it.
3. Draw a horizontal line through the crotch curve
An easy way to make sure this line is horizontal is to make sure it is perpendicular to the grainline on your pattern.
Since the pattern fits above the waist, all the changes will be done below this line.
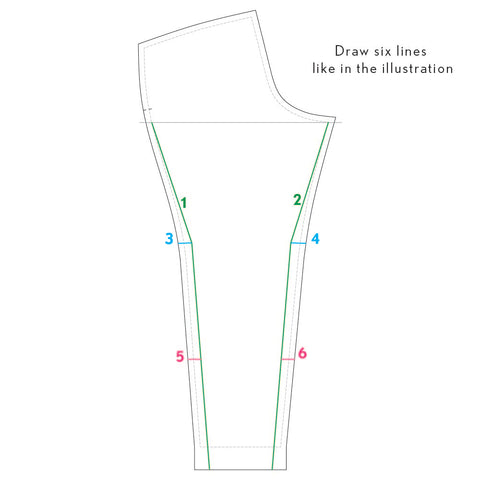
4. Draw in six adjustment lines
The placement of lines does not need to be precise, just do your best to mimic the illustration.
The two vertical lines (1 and 2) will run along the sides of the pant and will angle to blend with the stitching line on the inseam and side seam right around the horizontal crotch line you drew.
The four horizontal lines (3, 4, 5, and 6) will go out from the green vertical lines to the edges of the pattern. Two (lines 3 and 4) will be located around the knee area, and the other two (lines 5 and 6) around the ankle.
Don’t worry too much about the placement of these lines, a guesstimate is okay.
5. Cut through the lines
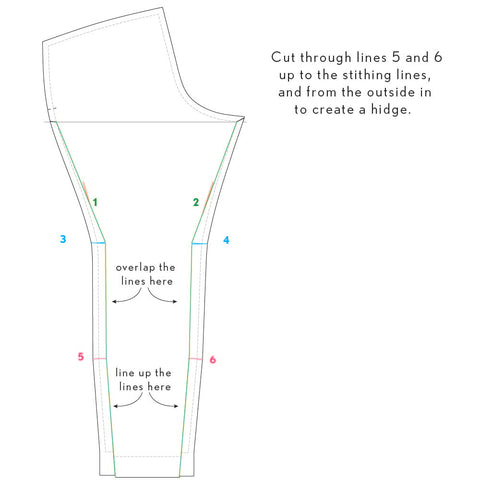
Start with the two vertical lines (1 and 2). Cut all the way up to where the line intersects with the seam line and stop. Then cut from the outside towards the pattern stopping at the seam line as well. This will create a hinge on which the pattern pieces can be rotated without changing the seam line length.
Repeat for the horizontal knee lines (3 and 4), but do not cut lines 5 and 6 yet.
6. Draw in more adjustment lines
Around mid-thigh measure out the distance from the edges of the vertical lines (1 and 2) equal to the amount you estimated to take out from your back thigh. I find it helpful to draw a little line, shown in red:
The ones in the illustration above are quite long, but they are just guides to help you move the pattern around.
7. Move the pattern piece
Next, start moving the side pieces of the pattern in towards the red lines you just drew.
Once you are happy with the alignment, tape them down. I like to use small pieces of tape here in case I need to re-adjust anything. I will add more tape in the end, once I am happy with how the rest of the adjustment went.
Use hinges along lines 3 and 4 to move the lower pattern piece back. You can stop here and just tape everything out when you are happy if you think you can take some ease out through the calf as well.
The illustration below shows the ease, in yellow, you will lose in the calf if you just tape every thing down now and call it a day:
8. This is cool, but I need my calf ease back
 If you don't want to lose any ease in the cuff, cut through lines 5 and 6 creating hinges at the stitching lines.
Using hinges in lines 3-6, move in the middle part of the pattern a little bit and move out the lower part until it meets the original green lines. This will take out the extra fabric above the calf while keeping the calf the same.
9. Add length back in
Note that this adjustment will slightly decrease the length of the pant leg, so make sure to add it back in.


That's it! This adjustment is a little bit more involved and seems intimidating at first, but it really is not. I hope this help with fitting your Lisbeth and other pants. Let me know if you have any questions!
xoxo,
Anya


Leave a comment
This site is protected by hCaptcha and the hCaptcha Privacy Policy and Terms of Service apply.